All Courses & Ebooks

Bending Rovers With Bending Machine - Welding, Level 5
FREE

This video lesson showcases the use of a manual bending machine, also known as a folding machine, for bending metal to achieve the desired angle. The instructor emphasizes the importance of precision in measurements and markings to ensure accurate bends. 

The lesson provides step-by-step instructions on marking reference lines, measuring and reducing distance, and adjusting the angle to produce the necessary bend. The lavas used for fabrication and the top of the door or window are also discussed in accordance with the required angle. The process of bending rovers is demonstrated, highlighting the importance of aligning and adjusting correctly and cleaning the machine, tools, and material after each work session.

Bed Linen & Room Amenities - Housekeeping, Level 3
FREE

The video lesson teaches about the different types of bed and bathroom linen found in hotel guest rooms, as well as the amenities provided for guests such as toiletries, stationery, and Do Not Disturb signs.  It also emphasizes the importance of guest feedback forms for understanding their needs and challenges. Additionally, the video explains the free-to-use facilities such as tea, sugar, and Nescafe and how they should be used by guests.

Butt Joint On Both Side - Welding Level 5
FREE

This video lesson discusses the process of welding a butt joint on both sides using a MIG welding machine.  The instructor highlights the importance of checking the machine's condition and adjusting the gas flow before welding.

Rolling Cylindrical Shape with Four Roller Machine - Welding, Level 5
FREE

This video lesson discusses using a four-roller machine to create cylindrical shapes in welding. The instructor explains how to use parallel line development to create the cylinder shape, how to divide the base into 12 equal parts, and discusses the different types of welding machines. 

The video features a practical demonstration of a four-roller machine with handles that can be used for driving or holding the workpiece in place. The rollers can be adjusted to increase or reduce the circumference or height of the cylinder. Proper alignment is necessary for quality results, and the distance between the rollers can be adjusted for varying thicknesses. The instructor explains how to load the workpiece onto the rolling machine, how to roll the cylindrical shape, and how to adjust the rollers to get a perfect circle. The video provides an introduction to the manual rolling machine and explains how to use it to create cylindrical shapes.

Servicing A Guest Room - Housekeeping, Level 3
FREE

These video lessons cover the servicing of a guest room.  When servicing a guest room there are different stages.  The room attendant must prepare themselves before cleaning the guest room, prepare cleaning supplies and rooming list with the number of rooms to be cleaned, organize trolley with bed linen, bathroom linen, and guest room supplies etc.

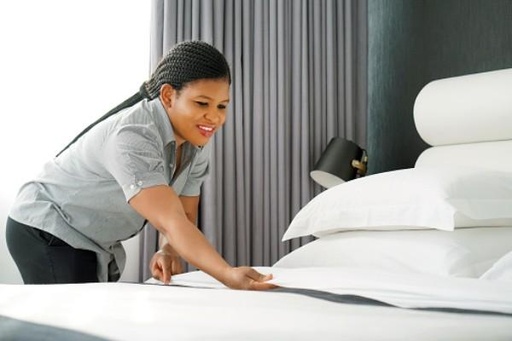
The guest bed must also be made.  The first step in making the bed is stripping it, which involves removing all the bed linen and checking for any guest belongings left behind.  After checking for guest belongings, remove the duvet cover and pillowcases, and arrange the bed linen smoothly.  Finally, make the bed properly, ensuring that the duvet is arranged neatly and the are fluffed.

Cleaning of the bathroom and guest room must be done.  Clean the mirror, shaving mirror, hand wash, and toilet seat; dry surfaces properly; dust the entire bathroom, including tile walls and towels; replenish amenities, such as shower gel, shampoo, and bath soap; mop the floor to finish the cleaning process.

Setting Up FCAW Equipment - Welding, Level 5
FREE

This video lesson explains the equipment and differences between Flux Core Arc Welding (FCAW) and MIG welding equipment. FCAW uses a covered electrode with flux inside, and the video shows how to insert it into the welding machine and connect the gun. The lesson also covers setting up the FCAW equipment, preparing it for welding with flux and shiny glasses, and adjusting the machine and S cable.

Setting Up MIG MAG Equipment - Welding, Level 5
FREE

The video lesson discusses the different names for MIG/MAG welding depending on the gas used, with co2 being called metal active gas welding and inert gases like argon being referred to as metal inert gas welding. The equipment required for MIG/MAG welding is covered, including the welding machine, wire feeder, co2 cylinders, flow meter, and cables. 

The lesson explains how to set up the equipment, manipulate and change the electrode for different workpieces, and adjust the gas flow and other settings for MIG MAG welding. It also emphasizes the importance of safety and turning off the machine after use.

Setting Up TIG Equipment & Current - Welding, Level 5
FREE

This video tutorial covers the setup and use of TIG welding equipment. It explains the different colours of tungsten electrodes used for welding and their classification, as well as the equipment required, including a welding machine, a cylinder containing argon gas, a pressure regulator, and flow meter. 

The instructor also demonstrates how to set up the TIG welding equipment, including the use of a tungsten electrode, how to strike an arc and the importance of safety precautions. The video emphasizes the importance of practice to develop the required skills for welding.

Performing a Dynamic Cone Penetration - Road Construction, Level 5
FREE

This video lesson explains the purpose and equipment used in a dynamic cone penetration (DCP) test, which estimates the institute CBR of soil in civil engineering. The DCP device comprises a vertical scale, drive road, cone, sliding attachment, and 8-kilogram hammer that is lifted and dropped to record penetration depth and number of blows required. The team then removes the drive road and equipment parts after determining the in-situ CBR strength.

Performing The Proctor Test - Road Construction, Level 5
FREE

In these video lessons the instructors demonstrate the compaction process for the Proctor Test using the modified compaction effort. They use the 4.5 kg rammer to compact the soil into three layers with 25 blows each, while carefully removing any excess soil from the top layer. 

They then demonstrate how to extract the compacted soil sample from the mold and weigh it, as well as how to calculate the bulk density and dry density of the soil. The video lesson concludes with a discussion on the significance of the results obtained from the Proctor Test and their application in earthworks and construction projects.

Cleaning Of A Vacant Room - Housekeeping, Level 3
FREE

This video lesson covers the cleaning of a vacant room.  Some of the steps include the following; Remove any sleep well cards and reorganize the bed to standard; Turn off the lights and remove any breakfast cards; Draw the curtains and decorate the bed as it should be during the day; Dust the room with a dry cleaning cloth; Check the bathroom amenities and supplies, fold toilet paper, and mop the floor- Spray air freshener and do a final check of the room; Vacuum the carpet to finish the cleaning process.

Turn Down Service - Housekeeping, Level 3
FREE

Turn down service is an extra service offered to hotel guests to facilitate their sleep.  The procedure starts by drawing the curtains.  Turn down bed covers so that it is ready for sleeping.  A sleep well card is placed on the bed and turn down mats and slippers are provided.  A breakfast card is placed for guests to order breakfast without going to the restaurant.  The chair is left half open and the TV remote is placed in its correct place.  The procedure is checked and everything is made neat and ready for sleeping.  

Turn down service is not done in all hotels but is an important service for guests.

Cleaning Of Public Areas - Housekeeping, Level 3
FREE

This lesson covers the cleaning of public areas.  Public areas have different surfaces that require specific tools and products for cleaning.  Before cleaning, identify all surfaces and collect the necessary equipment.  Start by opening curtains and checking for any leftover items.  Vacuum carpets before dusting, starting from the far end to the exit.  Check for stains and use appropriate cleaning products.  Clean wooden surfaces with multi-surface cleaner.  Dust stair handles and mop stairs, taking care to clean both sides of each step.  

Manage dust by checking at intervals and adjusting cleaning frequency as needed.  Check for any rubbish or items left behind by guests or visitors.  Take care not to damage painted surfaces with water.  Regularly check and maintain cleanliness of public areas.

Techniques For Cutting Vegetables - Culinary Arts, Level 3
FREE

This video lesson covers different techniques for cutting vegetables.  Variety of vegetables are cut into different shapes.  Julienne is a french method of cutting vegetables into small sticks.  Vegetables like peppers, tomatoes, carrots, onions, and potatoes can be cut into julienne.

Brunoise is a method of cutting vegetables into fine dices.  Macedoine is a method of cutting vegetables into small cubes and is usually used for fruit salad preparation.  Dices are larger than macedoine and are cut into the same shape.  Paysanne is a thin, flat, and square cut of vegetables.  Chiffonade is a style of cutting vegetables into thin strips, usually used for salads.  Batonnet is a method of cutting vegetables into sticks, like butternut, carrots or cucumbers.

Blanching & Glazing of Vegetables - Culinary Arts Level 3
FREE

This video lesson covers the cooking methods blanching and glazing of vegetables.  Blanching is a cooking method where vegetables are boiled in water above 100 degrees Celsius with a pinch of salt to maintain taste and colour.  Vegetables should be boiled for 10-15 minutes to make them edible and crunchy.  Blanching is a pre-preparation method for vegetables before other cooking methods like sautéing or pan-frying.

The video demonstrates how to blanch and peel tomatoes, spinach, cauliflower etc.  Glazing involves cooking vegetables in butter and sugar until they are crunchy and shiny.  Carrots can be cut into any shape desired before being grazed.  Cooling vegetables quickly after cooking is important to prevent bacterial growth.

Preparing Stocks - Culinary Arts, Level 3
FREE

This video lesson covers the preparation of stocks.  Stocks are liquids that contain soluble nutrients and flavor extracted from vegetables, bones, and spices by prolonged simmering.  A good stock has fresh vegetables, herbs, bones, and spices.  Brown stock uses brown mirepoix (a combination of vegetables with carrots) while white stock uses white mirepoix (a combination of vegetables without carrots).  

Chicken stock requires deboning chicken and chopping the bones into small pieces.  Fish stock requires a white mirpua and fish bones or trimmings.  Fish stock is only used for fish and seafood dishes due to its strong flavor.  Salt and pepper should be added sparingly to avoid producing overly salty sauces or soups.  Stock is a foundation of cooking and can be used to produce many sauces and soups.

Roasting & Sautéing Techniques - Culinary Arts Level 3
FREE

There are a variety of vegetables available for sautéing, including carrots, spinach, french beans, garden peas, cauliflower, zucchini green pepper, and onions.  A range of condiments, including salt, white pepper, aromat, chopped garlic, chopped onion and fresh cream can be used.  Vegetables can also be grilled and roasted, these techniques are demonstrated in this video lesson. 

Preparation of Compound Salads - Culinary Arts Level 3
FREE

This video lesson teaches how to prepare compound salads step-by-step, using egg Russian salad and Greek salad as examples.  It emphasizes the importance of balancing colour and ingredients, adding mayonnaise, salt and pepper to the dressing the salad, and adding a base and garnish.

Preparing Soups - Culinary Arts, Level 3
FREE

Soups are a great option for simple meals and are very nutritious.

Soups can be classified into thin soups, clear soups, cream soups, special soups, and national soups.  Making soups requires attention to detail and proper technique.  These video lessons gives a comprehensive guide to making different types of soups using a variety of ingredients.

Cooking Of Meat, Fish & Poultry - Culinary Arts, Level 3
FREE

These video lessons demonstrate how to prepare meat, fish and poultry, namely grilled steak, grilled tilapia fillet, fillet fish in butter and roasted chicken.

Variation of Steamed Rice - Culinary Arts, Level 3
FREE

This video lesson covers the use of steamed rice to develop different dishes.  How to cook tumeric rice and oriential rice is demonstrated.

Preparation of Salads - Culinary Arts, Level 3
FREE

In this video, the instructor demonstrates how to make two types of salad dressings: vinaigrette and tata sauce. For the vinaigrette dressing, he combines chopped onions, white vinegar, olive oil, salt, and white pepper. For the tata sauce, he uses mayonnaise, onion, parsley, capers, peppers, gherkins, and boiled egg white.  The instructor emphasizes the importance of harmonizing the flavors of the dressing with the salad ingredients and encourages viewers to experiment with different flavor combinations to create unique dressings.

Preparation of Mother Sauces - Culinary Arts, Level 3
FREE

This video lesson teaches the concept of sauces and introduces the mother sauces, which serve as the foundation for many other types of sauces.  Mother sauces such as fish verte and basic brown sauce or demi-glace are demonstrated.  Other sauces such as chicken verte, bechamel sauce and veloute are also demonstrated.

Cooking of Steamed Rice - Culinary Arts, Level 3
FREE

This video lesson demonstrates how to prepare steamed rice, which is the base for many dishes. The chef advises monitoring the readiness of the rice closely.  The video also talks about using steamed rice to make different varieties such as tomato, carrot, vegetable, turmeric, and coconut rice.

Restaurant Opening Duties - Food & Beverage, Level 3
FREE

These video lessons discuss the opening duties of a restaurant, focusing on cleaning and polishing cutlery and glassware.  The instructor provides tips on how to clean cutlery and demonstrates how to properly clean various types of glasses without leaving fingerprints or accidentally breaking them. The video emphasizes the importance of maintaining hygiene and arranging the service area in preparation for guests. The series covers a range of topics related to food and beverage service, including taking orders, serving food and drinks, clearing tables, billing, and bidding farewell to guests.

Preparation of Roux for Mother Sauces - Culinary Arts, Level 3
FREE

This video lesson covers the preparation of Roux for mother sauces.  Roux is a combination of fat and flour cooked together.  Roux is used as a thickening agent in various dishes such as sauces and soups.  There are three types of roux: white, blonde, and brown.  White roux is used for white sauces and soups, blonde roux for velouté sauces, and brown roux for brown sauces and soups.  Different types of roux have different colors and flavors.

Table A La Carte Setup - Food & Beverages, Level 3
FREE

These video lessons discuss two types of menu settings: a la carte and table d'hôte.  It covers the setting up of tables including, glasses, plates and cutleries.

Preparation & Plating of Fruits - Culinary Arts, Level 3
FREE

This video lesson discusses the preparation and plating of fruits.  Fruits are an important food group and are full of nutrients, especially vitamin C.  Fruits can be prepared as individual plates or platters.  Different types of fruits include hearty fruits (green apple), citrus fruits (orange), soft fruits (strawberry), and tropical fruits (pineapple, papaya, mango).

Preparation of Pasta - Culinary Arts, Level 3
FREE

These video lessons covers the preparation of pasta.  Pasta is a popular Italian dish that has become international.  The video demonstrates the preparation Penne pasta and Spaghetti which are types of pasta, it also provides a step-by-step guide to making pasta with cheese sauce.

Roasted Potatoes & French Fries - Culinary Arts Level 3
FREE

This video lesson covers Roasting Potatoes and making French Fries.  Roasting potatoes involves combining two cooking methods: blanching and oven roasting.  French fries are made by cutting potatoes into thin, batonnet shapes and deep frying them.  Watch for a step-by-step guide on how to prepare them.

Vegetables Mise En Place - Culinary Arts, Level 3
FREE

Mise en place is a French term for having all your ingredients measured, cut, peeled, sliced, grated, etc. before you start cooking. Pans are prepared. Mixing bowls, tools and equipment set out.  By making sure ingredients are prepped and workstations are organized before you begin assembling a dish, you'll save time. And not only will you waste fewer minutes completing prep work, but you'll also eliminate unnecessary steps or duplicate work in the kitchen.

These video lessons provide a comprehensive guide in preparing and processing vegetables for use.

Preparation of Simple Salads - Culinary Arts, Level 3
FREE

This video lesson looks at simple salad preparations.  Salads can be simple or compound, and can be a meal or a course itself.  Salad ingredients can be raw or cooked, or both, and are usually served with dressing.  

There are two types of salads: simple salads and mixed or compound salads.  Simple salads have one ingredient with dressing and other components.  Mixed or compound salads have multiple ingredients with dressing and other components.  Salads can be served with dressing on top or dressing aside, depending on preference.

Taking Beverage Orders - Food & Beverages, Level 3
FREE

The video emphasizes the importance of cleanliness and proper etiquette when taking food and beverage orders, highlighting the "big five" tools a waiter should have, and the importance of presenting the menu to guests with the lady first. Proper order taking procedures are crucial, with ladies served first before men, and writing orders down in a captain's book before repeating them to confirm accuracy, ensuring efficient and accurate service for all guests. The video also demonstrates how to suggest and take beverage orders for guests, encouraging viewers to take notes and follow the demonstrated sequences.

Taking Food Orders - Food & Beverages, Level 3
FREE

This video lesson discusses how to take food orders in a restaurant, emphasizing the importance of starting with starters and appetizers and then the main course, followed by desserts.  Waiters should provide details such as accompaniments and sauces when taking orders, and the main course should take 25 minutes.

Serving Beverages - Food & Beverages, Level 3
FREE

The first video lesson covers the various types of beverages and subcategories that servers may encounter, including hot beverages, soft drinks, beers, and spirits. The speaker explains the differences between teas and coffees, and highlights the subcategories of waters and sodas. They then discuss different types of alcoholic beverages and their origins, emphasizing the wide range of vodka flavors available.

The second video lesson covers the topic of serving beverages and matching different types of drinks with appropriate glasses. Specific glasses for various alcoholic beverages were highlighted, including martini, cognac, whiskey, liqueur, and champagne, along with their unique features. The importance of choosing the right glassware when serving drinks to guests was emphasized, and common types of glasses used when setting a table, such as the water goblet, red wine glass, white wine glass, and champagne flute.

Serving Soft Drinks & Water - Food & Beverages, Level 3
FREE

This video is about serving soft drinks and water in a food and beverage setting. The server emphasizes the use of coasters to prevent damage to linen from condensation and presents the bottle to the guest before pouring. They also demonstrate serving warm water without coasters and ensuring the label of the bottle faces the guest.

Serving Hot Beverage - Food & Beverages, Level 3
FREE

This video explains the proper procedures for serving coffee and other hot beverages in a hotel or restaurant setting. It covers checking the order, arranging the accompanying items correctly on a tray, and providing guests with hygienic sugar options. The order of hot water, milk, sugar, and tea bag is outlined for serving hot beverages, and the importance of correctly naming and introducing a drink is stressed.

Serving Bottled Beer - Food Beverage, Level 3
FREE

This video teaches how to properly serve bottled beer in a clear, straightforward manner. To start, it’s important to ensure the proper serving temperature is achieved, then use the appropriate glass to pour, making sure to pour slowly at a 45-degree angle and avoid contact between the glass and bottle.  Any remaining beer should then be placed beside the guest with the label facing them.

Serving Spirit & Bottled Beer - Food & Beverage, Level 3
FREE

This video demonstrates how to serve spirits and bottled beer properly to customers, emphasizing the importance of serving customers on their right side and obtaining permission before touching or moving anything on the table. The video also highlights the proper way to pour beer into a glass at a 45-degree angle without letting the bottle touch the glass and how to create a head on the beer for optimal presentation.

Service of Spirits - Food & Beverage, Level 3
FREE

This video teaches the proper way of serving spirits using a tot measure and the importance of washing it between drinks to avoid mixing flavors. The bartender also explains the difference in serving a martini and other spirits, where a tot measure is not required. The video concludes by teasing the next topic of wine service.


Serve Wine - Food & Beverage, Level 3
FREE

The video lessons explain the classification of wines by color, including red, white, and rosé. It also discusses the types of wines, such as table wines, sparkling wines, fortified wines, and aromatized wines.  It also outlines the proper procedure for serving wine, beginning with collecting the wine order and identifying the specific wine to the host.

The lessons cover proper techniques for opening and serving wine to guests.  The instructor explains how to open a bottle of sparkling wine or champagne and demonstrates how to correctly serve sparkling wine to guests. He emphasizes the importance of facing the label of the bottle towards the host and using caution when popping the champagne cork.

Serving Food, Clearing The Table, Presenting the Bill - Food & Beverage, Level 3
FREE

In this video lesson the instructor explains the proper way to serve food during a four-course meal and how to clear the table in a sequence while presenting the bill.  The video demonstrates how to adjust cutlery according to each course and how to serve soup with proper etiquette.

The lesson also demonstrates proper techniques for clearing the table after the main course, presenting the bill, and bidding farewell to customers. Presenting the bill quickly and correctly is crucial to avoid customer complaints and loss of trust.  Bidding farewell also creates a good impression and encourages customers to return. The video emphasizes the importance of providing excellent service and professionalism within the hospitality industry.

Closing Duties - Food & Beverage, Level 3
FREE

The video lesson covers the closing duties of a food and beverage server, including clearing soiled items from tables, properly stacking cutlery and dishes, and setting tables for the next shift. It emphasizes the importance of communication and preparation in ensuring a smooth transition between shifts.

Cooling System - Automobile Level 3
FREE

In this video, an instructor discusses the cooling system in an automobile. The cooling system is necessary to regulate the temperature of the engine and prevent it from overheating. The instructor explains that the cooling system includes a radiator, water pump, thermostat, and hoses. The radiator is responsible for removing heat from the coolant by transferring it to the air that flows through the fins on the radiator. The water pump circulates the coolant through the engine block and radiator, while the thermostat regulates the temperature of the coolant. The hoses connect all the components of the cooling system together. The instructor emphasizes the importance of proper maintenance of the cooling system, including checking the coolant level, inspecting hoses for leaks, and replacing the thermostat periodically. The video concludes with a reminder to refer to the vehicle's owner's manual for specific maintenance intervals and procedures.

Lubricating System - Automobile Level 3
FREE

The lubricating system is a crucial part of an automobile's engine that reduces friction between the moving parts and increases the lifespan of the engine. The system circulates oil through the engine to lubricate all the moving parts. It comprises a lubricant, a pump, and a filter. The oil pump forces the lubricant through the filter and into the engine. The filter removes impurities from the oil, and the lubricant coats and protects the engine's metal surfaces. The oil pan collects the oil as it drains from the engine, and it is then pumped back into the engine to continue the cycle. A properly functioning lubrication system is essential for an engine's longevity and performance.

Wheel Alignment - Automobile Level 3
FREE

In the Wheel Alignment lesson for Automobile Level 3, learners are taught about the importance of wheel alignment and how to perform it correctly. The lesson covers the different types of wheel alignment, including front-end and four-wheel alignment, and explains the effects of poor wheel alignment on vehicle performance and tire wear. Learners will also be introduced to the tools and equipment needed to perform wheel alignment, as well as the procedures for adjusting caster, camber, and toe angles. By the end of the lesson, learners should have a solid understanding of wheel alignment principles and techniques, and be able to perform basic wheel alignment tasks on a variety of vehicles.

Cylinder Head & Accessories - Automobile Level 3
FREE

In the Cylinder Head & Accessories lesson of Automobile Level 3, students learn about the construction, function, and maintenance of the cylinder head and related components in an automobile engine. Topics covered include the different types of cylinder heads, the role of valves and valve guides, the function of the camshaft, and the importance of proper maintenance of the cylinder head. Students will also learn how to identify and diagnose common problems with the cylinder head, such as valve wear, valve guide wear, and camshaft wear. Overall, this lesson provides a comprehensive understanding of the importance of the cylinder head and accessories in maintaining the health and performance of an automobile engine.


Crankshaft Removal - Automobile Level 3
FREE

Crankshaft removal is a task that is typically performed during an engine overhaul or repair in automobiles. It involves removing the crankshaft, which is the part of the engine that converts the linear motion of the pistons into rotational motion. The crankshaft is a complex component with several bearings and journals, so it must be removed carefully to avoid damage. During the process, the engine block is disassembled, and various accessories such as the timing belt and oil pump are removed to gain access to the crankshaft. Once the crankshaft is removed, it can be inspected for wear or damage and either repaired or replaced if necessary. The task requires specialized tools and knowledge of engine mechanics, and should only be performed by experienced professionals.

Piston & Connecting Rod Disassembly - Automobile Level 3
FREE

In this video lesson for Automobile Level 3, the instructor demonstrates how to disassemble the piston and connecting rod from an engine. The instructor begins by explaining the importance of removing the oil pan and the cylinder head to access the piston and connecting rod. They then show how to remove the piston rings and the connecting rod cap before separating the piston from the connecting rod. Throughout the lesson, the instructor provides helpful tips and best practices to ensure a successful disassembly process.

Piston Rings & Connecting Rod Reassembly & Crankshaft Installation - Automobile Level 3
FREE

This video lesson on Automobile Level 3 covers the process of reassembling the piston rings and connecting rods, as well as installing the crankshaft. The instructor starts by demonstrating how to properly align the piston rings and install them onto the piston, ensuring that the gaps are correctly positioned. They then show how to lubricate and install the connecting rod bearings onto the rod, and how to properly torque the connecting rod bolts. 

Next, the video covers the process of installing the pistons and connecting rods into the engine block, and how to properly torque the connecting rod cap bolts. Finally, the instructor shows how to install the crankshaft and properly torque the main bearing cap bolts, ensuring that the engine is correctly assembled and ready for use.

Engine Timing - Automobile Level 3
FREE

In this video lesson on Engine Timing at the Automobile Level 3, the instructor explains the process of properly aligning the timing marks on the engine to ensure that the valves and pistons move in sync. The video covers the different components involved in engine timing, including the crankshaft, camshaft, timing chain/belt, and tensioner. The instructor also demonstrates how to check the timing with a timing light, and how to adjust the timing if necessary. Additionally, the video covers common problems that can occur with engine timing, such as bent valves or damaged pistons, and how to diagnose and repair these issues.

Ignition System - Automobile Level 3
FREE

In this video lesson, learners will be introduced to the ignition system of an engine. The instructor will explain the importance of the ignition system and its components, such as the battery, ignition coil, distributor, spark plugs, and more. The learners will be shown how to test and troubleshoot these components using a multimeter, and will also learn about common issues that can affect the ignition system and how to fix them. By the end of the lesson, the learners will have a good understanding of how the ignition system works and how to maintain it properly.


Basic Electrical Installation Part - Electronics, Level 3
FREE

This lesson provides an overview of the basic concepts and principles of electrical installation. It covers topics such as electrical safety, wiring methods, electrical components, and circuit protection. The lesson also includes a hands-on practical component, where students will have the opportunity to apply the concepts they have learned. The lesson is designed for students who are interested in a career in electrical installation and is also a valuable resource for anyone who wants to learn more about electrical safety and installation.

Basics Of Electronics - Electronics Level 3
FREE

This video lesson provides an introduction to the basics of electronics. It covers topics such as:

- What is electricity?
- What are electrons?
- What are circuits?
- What are components?
- How do components work together?
The lesson also includes a number of practical exercises that will help you to understand the concepts that are being discussed.

This video lesson is designed for students who are new to electronics. It is a great way to learn the basics of electronics and to get started with your electronics journey.

Here are some of the key takeaways from the video lesson:

- Electricity is the flow of electrons through a conductor.
- Electrons are negatively charged particles that orbit the nucleus of an atom.
- Circuits are paths that allow electricity to flow.
- Components are devices that are used to control or modify the flow of electricity.
- Components can be combined to create circuits that perform a variety of functions.

Cellphone Software Repair - Electronics 3
FREE

This video lesson teaches you how to repair software problems on cellphones. It covers topics such as:

  • How to identify software problems
  • How to troubleshoot software problems
  • How to fix software problems

The lesson also includes a number of practical exercises that will help you to learn the skills that you need to repair software problems on cellphones.

This video lesson is designed for students who are new to cellphone software repair. It is a great way to learn the skills that you need to repair software problems on cellphones and to get started with your cellphone software repair career.

Here are some of the key takeaways from the video lesson:

  • The first step in repairing a software problem on a cellphone is to identify the problem.
  • Once you have identified the problem, you need to troubleshoot the problem to find the cause.
  • Once you have found the cause of the problem, you can fix the problem.


Cellphone Hardware Repair - Electronics Level 3
FREE

This video lesson teaches you how to repair hardware problems on cellphones. It covers topics such as:

  • How to identify hardware problems
  • How to troubleshoot hardware problems
  • How to fix hardware problems

The lesson also includes a number of practical exercises that will help you to learn the skills that you need to repair hardware problems on cellphones.

This video lesson is designed for students who are new to cellphone hardware repair. It is a great way to learn the skills that you need to repair hardware problems on cellphones and to get started with your cellphone hardware repair career.

Repair Synthesizer - Electronics Level 3
FREE

Electronics is a branch of physics and electrical engineering that deals with the emission, behaviour, effects of electrons and with electronic devices.

Electronics encompasses a broad range of technology.  Today many scientific and technical disciplines deal with different aspects of electronics. Research in these fields has led to the development of key devices such as transistors, integrated circuits, lasers and optical fibers. These in turn have made it possible to manufacture a wide array of electronic consumer, industrial, and military products.

Electronics studies focus on the design of systems and devises with circuit boards. Electric energy is a main component and the field incorporates other areas as well such as chemistry, math and physics. Students may be able to specialize in certain areas such as information electronics and digital media technology.

These video lessons introduce students to the basic components of electronics, the basic operation and some common applications.


Dvd Player Repair - Electronics Level 3
FREE

This video lesson teaches you how to repair common problems on DVD players. It covers topics such as how to identify, troubleshoot, and fix common DVD player problems. The lesson also includes a number of practical exercises that will help you to learn the skills that you need to repair common problems on DVD players. This video lesson is designed for students who are new to DVD player repair. It is a great way to learn the skills that you need to repair common problems on DVD players and to get started with your DVD player repair career.

Radio Receiver Repair - Electronics Level 3
FREE

This video lesson teaches you how to repair common problems on radio receivers. It covers topics such as how to identify, troubleshoot, and fix common radio receiver problems. The lesson also includes a number of practical exercises that will help you to learn the skills that you need to repair common radio receiver problems. This video lesson is designed for students who are new to radio receiver repair. It is a great way to learn the skills that you need to repair common radio receiver problems and to get started with your radio receiver repair career.


Audio Amplifier Repair - Electronics Level 3
FREE

This video lesson teaches you how to repair common problems on audio amplifiers. It covers topics such as how to identify, troubleshoot, and fix common audio amplifier problems. The lesson also includes a number of practical exercises that will help you to learn the skills that you need to repair common audio amplifier problems. This video lesson is designed for students who are new to audio amplifier repair. It is a great way to learn the skills that you need to repair common audio amplifier problems and to get started with your audio amplifier repair career.

Audio Transducer - Electronics Level 3
FREE

This course will cover the design and operation of audio transducers, such as speakers and microphones. You will learn about the different types of transducers, how they work, and how to troubleshoot and repair common problems.

TV Receiver - Electronics Level 3
FREE

In this video lesson you will learn about the different components and circuits of a TV receiver.  You will gain knowledge of how the different parts of the receiver work together, how to diagnose and repair common problems, and how to perform basic maintenance tasks.

Decoder Repair - Electronics Level 3
FREE

This lesson teaches how to repair a decoder, which is an electronic device that converts one type of signal into another. Decoders are used in a variety of applications, including televisions, radios, and computers. The lesson covers the common problems that can occur with decoders and how to troubleshoot them. The lesson also includes a hands-on component, where students will have the opportunity to repair a decoder. The lesson is designed for students who are interested in a career in electronics repair.


Identifying Tools - Production Technology Level 3
FREE

The video lesson “Identifying Tools - Production Technology Level 3” teaches students about the different types of tools used in production technology. It covers the names, uses, and functions of various tools, including hand tools, power tools, and measuring tools. The lesson also includes a hands-on component, where students will have the opportunity to identify and use different tools. The lesson is designed for students who are interested in a career in production technology.


Measuring Tools - Production Technology Level 3
FREE

The video lesson "Measuring Tools - Production Technology Level 3" teaches the different types of measuring tools used in production technology. It covers the names, uses, and functions of various measuring tools, including rulers, tape measures, calipers, and micrometers. The lesson also includes a hands-on component, where students will have the opportunity to identify and use different measuring tools. The lesson is designed for students who are interested in a career in production technology.


Using A Metal File - Production Technology Level 3
FREE

In this video lesson on "Using A Metal File - Production Technology Level 3" provides a comprehensive guide to effectively using a metal file in metalworking and production processes. The lesson covers the different types of metal files and their specific uses, emphasizing the importance of selecting the right file for the material and desired outcome. It demonstrates proper grip, posture, and various filing techniques, including push, draw, and smoothing strokes. Safety precautions and the use of personal protective equipment are highlighted to ensure a safe working environment. The lesson also emphasizes the importance of file maintenance, covering cleaning, storage, and periodic upkeep. Overall, this video equips viewers with the knowledge and skills needed to proficiently and safely use a metal file for shaping, smoothing, and refining metal surfaces in various applications.

Drill Press - Production Technology Level 3
FREE

This course covers the use and maintenance of a drill press in the production inThis video lesson provides an in-depth understanding of using a drill press in production technology. It covers the various components of a drill press, proper setup and alignment, selecting the right drill bits, and adjusting the speed and feed for different materials. Safety precautions and techniques for accurate drilling are also emphasized.dustry. Students will learn how to select and set up the appropriate drill bit, as well as how to safely and accurately drill holes in various materials.

Riveting A Joint - Production Technology Level 3
FREE

Hydraulic and pneumatic devices are all around us. 

Hydraulic systems are used in manufacturing and production plants, such as the steel and automobile industries, to operate all types of mechanical equipment.  They're used to move, push and lift materials in industries like mining, earthmoving and construction.  For example, the brakes on your car are hydraulically operated; the garbage truck uses hydraulic power to compact trash. 

A pneumatic system is a system that uses compressed air to transmit power. Usually, a centrally located compressor provides power to cylinders, rotary actuators, and other pneumatic devices through a system of tanks, pipes and valves.  For example, trucks and buses use air-actuated brakes. Spray painters use compressed air to spread paint. 

Through these video lessons you will learn the basics about pneumatics and hydraulics systems


Reciprocating Machine - Production Technology Level 3
FREE

This video lesson explores reciprocating machines in production technology. It explains the principles of reciprocating motion, the components of a reciprocating machine, and their functions. The lesson covers various types of reciprocating machines and their applications, providing insights into their operation and maintenance.

Pneumatics & Hydraulics
FREE

This course provides students with a comprehensive understanding of pneumatics and hydraulics systems, including their design, components, and operation. Students will learn how to install and maintain these systems in various applications, including manufacturing and industrial environments.

Ignition System - Automobile Level 4
FREE

This video lesson introduces the concepts of pneumatics and hydraulics, explaining their principles and applications in various industries. It covers the basic components of pneumatic and hydraulic systems, their functions, and the advantages of using these systems in automation and control. The lesson also highlights safety considerations and maintenance practices.

Sensors And Actuators - Automobile Level 4
FREE

This video lesson focuses on sensors and actuators in automotive systems. It explores the different types of sensors and actuators used in modern vehicles and their role in monitoring and controlling various functions. The lesson covers sensor calibration, diagnostics, and troubleshooting methods, providing a valuable insight into automotive technology.

Apply General Mathematics - Electronics Level 5
FREE

This video lesson focuses on applying general mathematics principles in the field of electronics at Level 5. It covers essential mathematical concepts and their practical applications in electronic circuits, calculations, and problem-solving. The lesson emphasizes the importance of mathematical skills in analyzing and designing electronic systems.

Miling Machine - Production Technology Level 5
FREE

In this video lesson, viewers learn about milling machines at Level 5 in production technology. It covers the operation and setup of milling machines, including selecting and installing cutting tools, adjusting feed rates, and controlling the machine for precise milling. The lesson also emphasizes safety measures and best practices in milling operations.

Engine Scanning - Automobile Level 4
FREE

This video lesson delves into engine scanning techniques at Level 4 in the field of automobile technology. It explores the use of scanning tools and diagnostic equipment to analyze and troubleshoot engine performance. The lesson covers interpreting scan tool data, identifying common engine issues, and implementing appropriate repair procedures.

Lathe Machine - Production Technology Level 4
FREE

In this video lesson, viewers will be introduced to lathe machines at Level 4 in production technology. The lesson covers the fundamental operation of lathe machines, including workpiece setup, tool selection, and turning operations. Viewers will gain a solid understanding of precision machining techniques, safety considerations, and the importance of proper lathe machine maintenance.

Injector Nozzle - Automobile Level 5
FREE

This video lesson focuses on injector nozzles at Level 5 in automobile technology. Viewers will learn about the function and operation of injector nozzles in fuel injection systems. The lesson covers troubleshooting common injector nozzle issues, maintenance procedures, and the significance of proper fuel atomization for optimal engine performance.

Distributor Injector Pump - Automobile Level 5
FREE

In this video lesson, viewers will explore distributor injector pumps at Level 5 in automobile technology. The lesson covers the components, function, and operation of distributor injector pumps in diesel engines. Viewers will gain insights into the calibration, repair, and maintenance of distributor injector pumps for efficient fuel delivery and engine performance.

Repair CCTV - Electronic Level 4
FREE

This video lesson focuses on repairing CCTV systems at Level 4 in the field of electronics. Viewers will learn troubleshooting techniques, identify common CCTV issues, and gain practical knowledge in repairing or replacing faulty components. The lesson emphasizes the importance of proper installation, configuration, and maintenance of CCTV systems for effective surveillance.

Repair Door Lock Code System - Electronics Level 4
FREE

In this video lesson, viewers will learn about repairing door lock code systems at Level 4 in electronics. The lesson covers diagnosing and troubleshooting door lock code system malfunctions, repairing or replacing faulty components, and programming new codes. Viewers will understand the significance of security and proper functionality in door lock systems.

Install CCTV - Electronics Level 4
FREE

This video lesson focuses on the installation of CCTV systems at Level 4 in the field of electronics. Viewers will be guided through the step-by-step process of installing CCTV cameras, configuring recording devices, and setting up monitoring systems. The lesson highlights best practices for CCTV installation, cable management, and system integration.

Repair Handheld Metal Detector - Electronic Level 4
FREE

In this video lesson, viewers will gain insights into repairing handheld metal detectors at Level 4 in the field of electronics. The lesson covers diagnosing and troubleshooting common issues with metal detectors, repairing or replacing faulty components, and calibrating the detector for accurate metal detection. Viewers will understand the importance of proper maintenance and performance testing for handheld metal detectors.

Repair Office Ups - Electronics Level 4
FREE

This comprehensive video lesson focuses on the repair of office Uninterruptible Power Supply (UPS) systems at Level 4 in the field of electronics. Viewers will gain practical knowledge and skills in diagnosing and troubleshooting common UPS issues, identifying faulty components, and implementing repair procedures. The lesson covers topics such as battery replacement, circuit board repair, and testing procedures to ensure the proper functioning of office UPS systems.

Repair Walkthrough Metal Detector - Electronics Level 4
FREE

This detailed video lesson focuses on the repair of walkthrough metal detectors at Level 4 in the field of electronics. Viewers will learn about the internal components and functioning of these detectors, common issues that can arise, and practical repair techniques. The lesson covers topics such as troubleshooting faulty sensors, adjusting sensitivity levels, and calibrating the detector for accurate metal detection.

Repair Xray Luggage Scanner - Electronics Level 4
FREE

In this comprehensive video lesson, viewers will explore the repair of X-ray luggage scanners at Level 4 in electronics. The lesson covers the working principles of X-ray scanners, diagnosing common issues, and repairing or replacing faulty components. Viewers will gain insights into calibration procedures, safety protocols, and maintenance practices for ensuring the reliable operation of X-ray luggage scanners.

Plumbing: Basics
Plumbing: Basics
FREE

The "Plumbing Basics" video explains the different types of plumbing piping and the joining methods used for each type. Plastic, steel, and copper pipes are discussed, including the varying temperature ratings and plumbing code approvals for PVC and CPVC plastic pipes. Joining methods such as threading for steel pipes and sweating or swaging for copper pipes are also explained, with both requiring soldering or brazing for a strong joint. Health and safety must always be considered during installation, and proper precautions should be taken by the installers.

How Your Home Plumbing System Works
FREE

In this section, the video explains the importance of proper maintenance and inspection of a home's plumbing system to prevent problems like leaks and backups. Regular maintenance involves checking for leaks, inspecting pipes for damage or corrosion, and ensuring that all valves and connections are tight and functioning correctly. The video also highlights some common plumbing problems such as clogged drains and toilets, leaky pipes, and malfunctioning water heaters. In the event of any issues, it's essential to seek professional help from a licensed plumber to avoid causing more damage. The video concludes by emphasizing the importance of responsible water usage and conservation to help reduce strain on the plumbing system and the environment.

Building a Block Wall
FREE

The video tutorial provides step-by-step instructions on how to build a block wall, including the tools needed such as a wheelbarrow, trowel, masonry hoe, and line blocks. The tutorial covers mixing mortar, preparing blocks, laying blocks with a lead and line, adding the enclosure, and laying a bond beam. The importance of leveling and plumbing the wall, as well as adding steel and filling the enclosure with mortar, is emphasized. Additionally, the video demonstrates how to use brackets and joint the wall with a concave joiner, while keeping the wall clean.

Efficient Block Laying Techniques
FREE

The video shows two different methods for laying blocks quickly and accurately. The first method involves using speed lead poles which are metal poles that are braced and plumbed on the corners. A string line is pulled between the poles to eliminate the need to freehand corners when laying blocks. This method saves time and ensures a perfectly level foundation up to 8 feet or higher. The video demonstrates how to set up the speed lead poles using 2x4s, steel square tubing, and C clamps, as well as how to establish a reference mark of elevation using a laser level.

The second method involves creating reference marks about 48 1/2 inches off the concrete footer, dropping down and making the actual marks, and hooking a string line to each line. The string lines are used to ensure the exact location and height of each row of block and provide a straight line to lay the block. The video also demonstrates how to move the string line up an 8-inch increment on each marked pole to keep the whole foundation level, even, and straight as it goes up. This method also ensures that the foundation is level and square, making it faster and easier to build a house.

Mastering Mortar Spreading Techniques
FREE

The video appears to be a tutorial on how to spread mortar for block work using a bricklayer's trowel. The instructor explains the different parts of the trowel and demonstrates how to test if the mortar is of good consistency. The video emphasizes the importance of body positioning, holding the trowel correctly, and using the "loaf method" for spreading the mortar. The instructor also teaches the proper technique for spreading mortar on block work, paying attention to body mechanics and how to smear mortar on the block before applying a head joint. Overall, the video emphasizes the importance of correct techniques and form, prioritizing safety and health over speed.

Introduction to Air Handling Units for Commercial & Industrial Buildings
FREE

This informative video lesson provides an introduction to air handling units (AHUs) used in commercial and industrial buildings. Viewers will learn about the purpose and components of AHUs, including fans, filters, dampers, and heating/cooling coils. The lesson covers the basic working principles of AHUs, their role in HVAC systems, and their importance in maintaining indoor air quality and comfort.

Understanding Constant Air Volume (CAV) HVAC Systems
FREE

In this video lesson, viewers will gain a comprehensive understanding of Constant Air Volume (CAV) HVAC systems. The lesson explores the working principles, components, and control strategies of CAV systems. Viewers will learn how CAV systems maintain a constant air volume while regulating temperature and humidity, and how to troubleshoot common issues and optimize system performance.

Chiller Fundamentals & Application Techniques in HVAC Process Engineering
FREE

This comprehensive video lesson provides an in-depth understanding of chiller systems used in HVAC process engineering. Viewers will learn about the basic principles of chiller operation, different types of chillers, and their applications in commercial and industrial settings. The lesson covers topics such as chiller components, refrigeration cycles, energy efficiency considerations, and troubleshooting techniques.

Variable Frequency Drives

In this informative video lesson, viewers will explore the fundamentals of variable frequency drives (VFDs) used in electrical systems. The lesson covers the working principles of VFDs, their applications, and the advantages they offer in controlling motor speed and energy consumption. Viewers will gain insights into VFD components, installation considerations, programming techniques, and troubleshooting procedures.

Vaccum Pumps - Basic Working Principle (HVAC)
FREE

This instructional video lesson provides a detailed overview of vacuum pumps used in HVAC systems. Viewers will learn about the basic working principles of vacuum pumps, their applications in HVAC systems, and the different types of vacuum pumps commonly used. The lesson covers topics such as pump operation, maintenance, troubleshooting, and safety considerations.

Travertino Romano Paint: Exploring Decorative Effects, Features & Applications
FREE

In this video, the focus is on the decorative capabilities of Travertino Romano paint, which can replicate the texture of Roman travertine. The paint is versatile, with various applications, and offers a fine texture and natural finish. However, the video also highlights potential health risks and the importance of using protective equipment when working with the paint. Travertino Romano paint can be used for surface protection, water selection, and color enhancement through light manipulation, making it a valuable choice for a range of projects.

Stucco Texture Design
FREE

To create a stucco texture design using Asian Paint Royale Play, start by preparing the surface to ensure it is clean, dry, and free of contaminants. Then, apply a coat of Asian Paint Royale Play Stucco Base Coat using a roller or brush and let it dry for 4-6 hours. Next, apply the first coat of Asian Paint Royale Play Stucco Texture with a trowel, let it dry, and then apply a second coat in a thicker layer, using the trowel to create the desired pattern and texture. After letting it dry, apply a coat of Asian Paint Royale Play Stucco Clear Coat to protect it and add a glossy finish. Let it dry for 4-6 hours, and your stucco texture design is complete.


Mastering Italian Stucco: A Step-by-Step Guide for Creating Marble Like Walls
FREE

This video lesson explains how to use Royale Play Italian Stucco special effect paint to create a marble-like finish on interior walls. It explains the required tools, preparation of surfaces and the application process involved in creating a unique design with the Italian Stucco paint.

Marble Wall Texture Painting
FREE

To create a marble wall texture design, start by preparing the surface you want to paint. Apply a base coat of the desired color and let it dry completely. Then, use a brush or roller to apply a marble effect paint in a crisscross pattern, blending the colors to create a realistic marble look. You can use a sponge or rag to add texture and depth to the pattern. Once you've achieved the desired effect, let the paint dry and apply a clear coat for protection. With these simple steps, you can easily create a beautiful and unique marble wall texture design.

Introduction to Electricity and Multimeter Testing
FREE

This video provides an introduction to the fundamentals of electricity, including voltage, current, and resistance, and explains how multimeters work. It also covers the various settings of multimeters and how they can be used to test continuity, voltage, resistance, and amps in electrical components. The video also emphasizes important safety tips when working with live voltage and advises leaving current testing to the professionals.

Step-by-Step Guide to Installing MC4 Connectors
FREE

This video provides a comprehensive, step-by-step guide on how to install or crimp MC4 connectors. It advises users to purchase an all-in-one kit and highlights the different components of a connector. 

The video demonstrates how to strip and crimp the wire to the connector and how to assemble both a positive and negative wire. It also emphasizes the importance of labeling connector parts to avoid mistakes.

How to Install Wall Bolts & Fix Heavy Objects
FREE

This video provides a step-by-step guide on how to install wall bolts, which are expanding metal fixings designed for holding incredibly heavy loads in solid walls. The video covers the different types of wall bolts and the tools needed for installation. It demonstrates how to correctly drill the hole and how to fit and tighten the bolt onto the object being attached to the wall. The video also includes tips on removing the hole fitting and emphasizes the strength of wall bolts for fixing heavy objects.

How to Wire a Ceiling Rose for a Light Fitting
FREE

This video provides a detailed guide on how to wire a ceiling rose for a light fitting. It covers the different components of a ceiling rose, including the line connector and switch live connector, and warns about the importance of turning off the power circuit before working on the ceiling rose. The video demonstrates how to correctly identify the wires that belong to the main lighting circuit and how to wire up the ceiling rose with a light fitting. It emphasizes the importance of testing connections and tightening screws before replacing the lid. The second section of the video shows how to safely wire a ceiling rose and check the correct placement of wires before turning on the power.

Fundamentals of Solar Photovoltaic Systems
FREE

This is a free public 1-hour webinar about the basics of solar photovoltaic systems for commercial and residential use.  This session will discuss:

- The process of converting the sun’s energy to electrical energy
- Understanding amps, volts, watts, and efficiency in the perspective of solar installations
- Overview of best practices for maintenance and care of solar photovoltaic panels

Electrical Safety: Best Practices
FREE

This is a free public 1-hour webinar about some best practices in workplace electrical safety, based on the 2021 NFPA 70E standard - USA  

National Fire Protection Association - NFPA 70E requirements for safe work practices to protect personnel by reducing exposure to major electrical hazards. Originally developed at OSHA's request, NFPA 70E helps companies and employees avoid workplace injuries and fatalities due to shock, electrocution, arc flash, and arc blast, and assists in complying with OSHA 1910 Subpart S and OSHA 1926 Subpart K.

Topics discussed will include:
- What are the hazards of electricity?
- The 8 steps for verifying an electrical circuit is de-energized
- Steps to follow for a proper lockout/tagout procedure
- How often should lockout/tagout training

Electric Motors Troubleshooting & Understanding
FREE

The "Electric Motors Troubleshooting and Maintenance Techniques" webinar discusses a variety of topics related to electric motors, such as the importance of being qualified before troubleshooting, different types of motors and their basic parts, using a multimeter to check windings, and troubleshooting and maintenance techniques. The instructors also cover the megohm test for a motor's windings, common causes of motor failure, and the hazards of misusing capacitors. They emphasize the importance of proper greasing for bearing maintenance and following the manufacturer's instructions carefully.

What is 3-Phase Electricity?
FREE

The term “3-phase” is used often in commercial and industrial applications, but the term is commonly misunderstood.  In this free public 1-hour webinar, will break down 3-phase power and how it works. 

Topics discussed include:
- Why do we use 3-phase power in today’s society? What are its benefits?
- How is 3-phase power transmitted and conducted through cities and facilities?
- How to understand multimeter readings on wires in a 3-phase electrical panel
- A brief overview of 3-phase terminology, such as power factor and kVA ratings

The Systematic Approach to Troubleshooting
FREE

The term "troubleshooting" is a central part of almost any technical career, whether it be maintenance, operations, or engineering. However, the process of troubleshooting can vary greatly from place to place. 

This free 1-hour public webinar will discuss a systematic troubleshooting approach that can be used any time you troubleshoot, regardless of whether it's on electrical systems, mechanical systems, HVAC, or operational. 

Discussion includes: - What are the key things to think about when troubleshooting? - What are some common mistakes made during the troubleshooting process? - What steps can we take without needing to exposed to hazards? - Some applications of the troubleshooting process

The Systematic Approach to Troubleshooting an HVAC System
FREE

When air conditioning and refrigeration systems are not cooling properly, it is important for the HVAC technician to get it up and running quickly and efficiently.  This free 1-hour public webinar is all about the systematic approach for troubleshooting HVAC systems. 

Topics include:
• Understanding temperature and pressure readings
• Determining superheating and subcooling and interpreting results
• Common scenarios and how to fix them

Understanding the Refrigeration Cycle as an HVAC Technician
FREE

When troubleshooting an air conditioning system, one of the most important skills an HVAC technician can have is understanding the refrigeration cycle. 

In this 1-hour webinar, we break down the working parts of the refrigeration cycle and how it translates to the operation of an air conditioning system.

Topics include:
-Core components of the refrigeration cycle and their location
-Understanding the relationship between temperature and pressure
-Understand the terms of superheat and sub cooling
-Best practices for troubleshooting an air conditioning system, using an understanding of the refrigeration cycle

Basic HVAC Controls
Basic HVAC Controls
FREE

Learn the basics of HVAC Controls. What are Analog and Binary Inputs and Outputs used for? See how a Fan Coil System, VAV System and Garage Carbon Monoxide Control System Works. 

These HVAC systems are used to control temperature, pressure, humidity, flow, and air quality. In this video you will learn how these HVAC systems use various controls to respond to the needs of the environments that they seek to control.

How to Use a Multimeter
FREE

This practical video lesson guides viewers through the proper usage of a multimeter, an essential tool for electrical measurements. Viewers will learn how to safely handle a multimeter, measure voltage, current, and resistance, and troubleshoot electrical circuits. The lesson provides step-by-step instructions and practical examples to enhance viewers' proficiency in using a multimeter for various electrical tasks.

Setting up a Successful Outdoor Catering Service in Nigeria: Tips & Guidelines
FREE

This video lesson explains the basics of catering and the requirements for starting an outdoor catering service in Nigeria. It provides a step-by-step guide for planning a successful outdoor event, including the pre-event, event, and post-event phases. The speaker emphasizes the importance of meeting with clients, taking notes, and pricing food appropriately when planning the pre-event phase.

Fish Production & Management
FREE

In Nigeria, the demand for fish is being met through two main sources which are domestic production and importation from foreign countries. The domestic production is from artisanal, industrial and culture fisheries with artisanal fisheries accounting for as much as 85% of total fish production, while industrial and culture fisheries accounted for 1% and 14% respectively. Due to the insufficiency of domestic production of fish, importation of fish and fish products accounts for more than half of fish supply in the country.

This training manual will focus on the areas of fish farming and general aquaculture practices as a means to diversify income for target groups.

A video lesson is also included; you will get tips on how to manage and take care of fish.

Surface Preparation In Painting
FREE

The video discusses the process of preparing walls for painting by filling in minor imperfections on drywall or plaster. To achieve a smooth finish, it is recommended to fill in both directions, wipe the claim up further under, and apply a slightly thicker final coat using a 3-4 inch filling blade. Excess filler is then removed to leave a smooth surface for easier sanding.

Travertino
Travertino
FREE

This video demonstrates how to create a Travertino effect using Nippon Momento Designer Series Special Effects Paint. The first step is to apply the base coat using a roller or brush and let it dry completely. Once the base coat is dry, apply the Travertino paint with a special tool included in the kit. The tool has a comb-like structure with grooves that help to create a textured finish. The Travertino paint should be applied in vertical and horizontal strokes, crisscrossing each other to create a unique pattern. After the Travertino paint has been applied, use a clean tool to smoothen out any rough spots or excess paint. The final step is to apply a clear coat to seal the Travertino paint and protect it from wear and tear. The clear coat should be applied in a thin layer and allowed to dry completely. By following these simple steps, anyone can create a stunning Travertino effect on their walls using Nippon Momento Designer Series Special Effects Paint.

Mastering Venetian Plaster
FREE

In this video lesson, you will learn how to expertly apply Venetian plaster step-by-step. The lesson will cover everything you need to know about preparing the supports, selecting the right tools, and using the correct technique to achieve a polished finish. You will learn how to mix primer and colorant to create your desired shade, and how to apply the plaster using a standard plastering trowel and stainless-steel spatula for subsequent coats and polishing. 

The video also emphasizes the importance of using a 45-degree angle with pressure to run the spatula on the surface for polishing. Finally, you will learn how to apply wax to the surface for a shine and added protection.

DIY Wall Decoration Ideas
FREE

This video lesson teaches or explains how to transform your walls into personalized and stunning works of art. The host will guide you through nine unique and creative DIY wall decoration ideas using simple tools and materials like drywall putty, adhesive tape, primer, water-based paints, and velvet colors. 

The step-by-step instructions will enable you to create your customized decor on your walls. Whether you want to paste, brush, or paint directly on your walls, the video will show you how to create unique and eye-catching designs that stand out. Additionally, the video highlights color combinations and introduces glaze, a slow-drying oil-based paint that can be highly moldable and customizable, adding a unique touch to your wall decoration

PVSyst7 - The Complete Course
FREE

PVsyst is designed to be used by architects, engineers, and researchers.  It is also a very useful educative tool. This video lesson includes a detailed contextual help menu that explains the procedures and models that are used, and offers a user-friendly approach with a guide to develop a project.

Types of Breakfast Served in Hotels
FREE

Hotels mostly serves three types of breakfast.  In this video we look at the difference between these three. 

1. Continental Breakfast
2. American Breakfast
3. English Breakfast

Types of Meals
Types of Meals
FREE

There are different types of meals.  In this video we explain the following types;

  • Early Morning Tea
  • Breakfast
  • Brunch
  • Lunch
  • Afternoon Tea / Low Tea
  • High Tea
  • Dinner
  • Supper
  • Midnight Snacks
Functions of Eggs in Culinary Arts
FREE

Eggs are a versatile and nutritious food used in many dishes, providing texture, structure, moisture, and flavor.  Eggs are used in cooking as binding and coating agents, leveling agents, emulsifying agents and to contribute flavor and colour.  In this video the structure and use of eggs in culinary arts is examined.

Cooking: Purpose & Methods
FREE

This video lesson explains the purpose of cooking as well as the different methods of cooking.  Topics covered includes;

  • Definition of Cooking
  • Aims and Objectives of Cooking
  • Methods of Heat Transfer
  • Effect of Heat on Food
  • Methods & Techniques of Cooking
Fish Cookery
Fish Cookery
FREE

This video lesson provide a detailed explanation about different types or classification of fish.  It also covers the selection, purchasing, cleaning and dressing of fish.

Types of Hotel Room Keys
FREE

This video lesson explains the history of hotel room keys and the different types of keys that are used in hotels.

Classification of Hotels
FREE

This video lesson takes a comprehensive look at different types of hotels and the importance of hotel classification.

Complaint Handling Procedure at Hotels
FREE

This video lesson looks at the following; how to handle guest complaints, the process of handling complaints, do's & dont's and the importance of handling complaints.

Hotel Guest Cycle
Hotel Guest Cycle
FREE

This video lesson looks at the different phases of the guest cycle;

  • Pre Arrival
  • Guest Arrival 
  • Occupancy
  • Departure
Types of Hotel Rooms
FREE

Different types of rooms are offered by hotels to guests.  Every hotel employee or staff should have good knowledge about hotel rooms especially those who are directly involved in selling or booking these hotel rooms.  

At the end of this video lesson you will be able to; Develop an understanding about various types of rooms; Identify features of each room; Develop an understanding of different room supplies placed in rooms; Identify amenities of a VIP room.

Hotel Room Reservations
FREE

This video lesson covers hotel room reservations.  Some of the topics include; 

  • Introduction to Room Reservations
  • Duties of Room Reservation Personnel 
  • Modes of Reservations
  • Sources of Reservations
  • Types of Reservations
  • Systems of Reservations 
Introduction to Hospitality Industry
FREE

This video lesson provides an introduction to the hospitality industry.  At the end of this lesson you will be able to understand;  

  • The meaning/concept of hospitality 
  • The complex structure of the hospitality industry 
  • Various sectors of the hospitality industry 
  • Characteristics/ features & nature of the hospitality industry 
A Day in the Life of an Assistant Beautician
FREE

This video lesson takes a look at a typical day in the life of an Assistant Beautician.   

Menu & Menu Planning
FREE

This video lesson provides a comprehensive look at menus and menu planning within the hospitality industry.

At the end of the lesson you will be able to; 

  • Understand the concept and development of a menu 
  • Explain the different types of menu 
  • Define the factors affecting menu planning 
  • Develop various kinds of menus 
  • Analyze the systematic approach for menu planning
French Classic Menu
French Classic Menu
FREE

This video lesson provides a comprehensive look at the French classical menu.

At the end of the lesson you will be able to;

  • Understand the concept of the French classical menu
  • Explain the different types of courses in the menu
  • Perform the compilation of a menu
  • Differentiate between seventeen courses and eleven course French classical menu
Room Service
Room Service
FREE

This video lesson looks at room service in the hotel industry.  At the end of the lesson you will be able to understand; 

  • The different types of equipment used in room service 
  • The importance of mise-en-place 
  • Different methods of taking room service orders 
  • Various tray set ups for various orders 
  • The service procedure
Beekeeping in the Caribbean
FREE

This professional training lesson provides participants with a comprehensive overview of beekeeping and honey production in the Caribbean. Participants will begin by gaining an understanding of the ecological importance of bees, basic honey bee biology and health & safety for beekeepers. This will be followed by exploring hive boxes, how to collect & analyze data through apiculture and tools & personal protective equipment used for management of bees. Disease & predators of honeybees will also be covered. 

Additionally, economic factors related to apiculture such as honey production, value-added products, packaging standards and gender considerations in beekeeping will be discussed. By completing this training lesson, participants will have a more informed knowledge base related to sustainable practices employed in Apicultural activities throughout the Caribbean region.

Author: Iyanola Apiculture Collective

Restaurant Waiters/Servers: Tips & Best Practice
FREE

Being a server at a restaurant is hard.  The best servers are master multi-taskers. Plus, your on-the-job performance can have a huge effect on a restaurant’s bottom-line and your tips. 

While much of a server’s personality is already ingrained, other aspects of service (like how well they know the menu, wine pairings and how they interact with customers) can be learned. 

So what does a server/waiter need to do to take their service from ordinary to extraordinary?  Watch these videos to gain some invaluable tips.

Food & Beverage (F&B) Service Interview Questions & Answers
FREE


A Food and Beverage (F&B) service interview is a crucial step in hiring for hospitality positions.  Applicants should prepare by researching the company, practicing common interview questions, and dressing appropriately.  


These video lessons take you through some common questions and answers one can practice before an F&B interview.

How to Make a Bespoke Jacket Course
FREE

The "How to Make a Bespoke Jacket Course" is designed for individuals who aspire to become skilled tailors or garment makers, with a focus on crafting bespoke jackets of the highest quality.  These free video lessons provide a deep dive into the art and craft of creating a bespoke jacket from scratch.  

Sego Gele
Sego Gele
FREE

Sego geles are named after the town of Sego in Oyo State, Nigeria, where they were first made. The town is known for its production of high-quality fabrics, and sego geles are considered to be some of the finest in the country. This free video lesson teaches you apt techniques in tying the sego gele.

Pleated Gele For Beginners
FREE

A pleated gele is a stylish and traditional headwrap commonly worn by women in various African cultures. It is a beautifully folded and sculpted fabric that is skillfully wrapped around the head to create an elegant and sophisticated look. 

The pleating technique adds volume, dimension, and a unique touch to the gele, making it a statement accessory for special occasions such as weddings, cultural events, or festive celebrations. With its intricate folds and stunning designs, the pleated gele showcases the rich cultural heritage and artistic expression of African fashion.

In this video lesson, you will learn how to tie a pleated gele.

Rose Gele
Rose Gele
FREE

The Rose Gele headtie style resembles the British Royal "Ascot Hats".  The style of gele was first created by the creator of "Abeke Makeovers". It is also Known as avant garde gele. This video lesson will teach you how to tie the Rose Gele.

Turban Headwrap
Turban Headwrap
FREE

A head turban headwrap is a piece of cloth that is wrapped around the head in a stylish and functional way. It can be used to protect the hair from the sun, to keep the head warm, or to simply add a touch of style to an outfit. Head turban headwraps are available in a variety of colors, patterns, and materials, so there is sure to be one that is perfect for everyone. In these  free video lessons you will learn how to tie a Turban Headwrap.

Microsoft Excel 2016
FREE

In these video lessons, you’ll get to know the functions and features of Excel 2016.  You will better understand how to use the powerful tools in Excel 2016 for organizing, visualizing, and calculating your data, including sorting, working with multiple worksheets, printing, creating complex formulas, working with charts, and doing more

Microsoft PowerPoint 2016
FREE

In these free video lessons, you’ll get to know the functions and features of PowerPoint 2016.  You’ll understand how to use tools in PowerPoint 2016 to create professional, compelling presentations, including applying themes and transitions, inserting pictures and shapes, aligning objects and more.

Microsoft Word 2016
Microsoft Word 2016
FREE

In these free video lessons, you’ll get to know the functions and features of Word 2016. With these lessons, you’ll understand how to use tools in Word 2016 to produce, polish, and share documents, including using indents and tabs, understanding formatting, adding hyperlinks and columns, using headers and footers, and more.

Electric Hot Water Tank
FREE 

In this free three-part video, a TVET instructor discusses the Electric Hot Water Tank, and how it is serviced. 

Beekeeping Business Opportunities in Nigeria
FREE

FarmerHubTV interviews Mr. Oduntan Adeshina CEO Bee - Craft Consult LLC USA (Utah) a German Trained Beekeeper to discuss on one of Nigeria's untapped goldmines and business opportunities.

Beekeeping is often promoted in the context of rural development because the practice provides monetary, nutritional, and social benefits to poor families, without requiring land ownership or large amounts of capital investment. It can be practiced as an additional source of income for farmers in rural areas and has been successfully implemented in poverty-alleviating projects.  Beekeeping plays a major role in the socio-economic development of rural livelihoods.  Beekeeping is a lucrative business if set up properly.


How Do Window Blinds Work?
FREE

This video covers how horizontal window blinds work. The mechanism that allows this to work is at the very top. The cord lock allows the blinds to be held up by pinching the lift strings between two rollers. The tilting of the blinds is handled by the wand tilt mechanism or the cord tilt mechanism. These mechanisms turn the gears, which turn the rod, the drums, which pulls the ladder strings to tilt the blinds.

Author: Jared Owen 

How does an Electric Motor Work?
FREE

The video "How does an Electric Motor Work? (DC Motor)" explains the basics of electricity and magnetism to help understand how an electric motor works. The video demonstrates the creation of an electromagnet. It explains the function of a commutator in a DC motor, which switches the electromagnet's polarity on the armature as it spins. The number of loops on the armature determines the motor's torque, and the spinning motion can be converted into different types of movement to power devices. The video also promotes Brilliant, an educational website offering courses on math and science, including electricity and magnetism.

 Electric motors can seem very mysterious! How do they use electricity to start rotating? Let's break it down step by step to understand how it works. Topics covered in this video: circuits, current, magnets, electromagnets, armature, commutator, brushes, stator, and rotor. This video only covers DC motors.

Author: Jared Owen 

How does an Oscillating Fan Work?
FREE

That table top fan that you use is more interesting than you think!  I took mine apart to see how it works.  The "four speed mechanism" releases any other button that was previously pressed down. Once a button is pressed a signal (voltage) is sent to the motor at the top of the fan. The oscillation motion is produced through the 4 bar mechanism. 

The last part of the video covers the gears that turn the 4 bar mechanism. The pin is part of the gears - when it is lifted the gears don't connect and the fan will no longer oscillate back and forth. 

Fundamentals of Painting
FREE

Learn the basics of painting in this painting training series.   Author: TEACH Construction Community Education

How To Mould Interlocking Stones In Nigeria
FREE

This YouTube video provides a detailed demonstration of making interlocking stones in Nigeria. The process involves mixing sand, fine gravel, cement, and water in a specific ratio to produce a perfect mixture, which is poured into a lubricated mold. After 24 hours, the block is removed and sprinkled with water to harden over time. The video also provides helpful tips, including adding water to the mixture in bits to prevent the concrete from setting before filling the mold. The process produces around 150 interlocking stones from one bag of cement and 13 pans of sand mixture. The video ends by mentioning that the next section will focus on preparing the ground for the stones.

Interlocking paving stones, also known as interlocking pavers, are small slabs made of concrete or cement typically used in the construction of decks, driveways, walkways, patios and roads.

This video guide shows you how to make interlocking stones with material you can pick in the market. Save a lot of money by making your own interlocking stones.


Setting Out, Tools & Equipment
FREE

Masonry is the art and craft of building and fabricating in stone, clay, brick, or concrete block. 

Setting out is the process of transferring the plan on paper to the actual ground or site of construction. A building is set out in order to clearly define the outline of the excavation and the line of the walls, so that construction can be carried exactly according to the plan.  

In these video lessons you will learn;

  • About the tools and equipment used within the masonry trade
  • How to set out and the importance of doing so


Building Walls With Bricks & Cement - Masonry Level 3
FREE

Masonry is the art and craft of building and fabricating in stone, clay, brick, or concrete block. 

From these video lessons you will learn to;

  • Identify the tools and materials that are used in the masonry trade 
  • Understand types of bonding
  • Proper mixing of materials for building a wall with bricks and cement
  • How to build a wall with bricks & cement


Basic Hand Tools in Construction
FREE


Hand tools are very essential for day-to-day jobs. They have been used by humans since ancient times to complete various useful tasks. Hand tools are of different types and can be used for any kind of work. Some tools are versatile and some of them are specifically used for a specific job.  

These video lessons cover basic hand tools used in general construction.


Author: TEACH Construction Community Education

Wall Plastering - Masonry Level 3
FREE
FREE

The video explains the process of wall plastering and the importance of covering rough surfaces with a thin coat of mortar. The plaster is applied in three coats, with the first being the base and the third being the finishing coat. The quantity of materials needed for each coat is calculated using specific ratios and formulas, and tools such as a spirit level, wooden float, and spade are essential for the job. The video also shows various tools and materials used for wall plastering, including a wooden box and a wheelbarrow.

Building A Slab - Masonry Level 3
FREE

Masonry is the art and craft of building and fabricating in stone, clay, brick, or concrete block. 

The video tutorial teaches how to build a reinforced concrete slab using a specific ratio of cement, sand, and coarse aggregates. The instructor explains the components of concrete and their role in the mixture, introduces the necessary tools and equipment, and stresses the importance of safety. The batching process for creating the concrete mix using the volume batching method with a standard wooden gorge box is explained, and the quantities of materials needed are determined based on the dimensions of the slab. The instructor concludes by asking participants to stay safe and signing off for the next session where they will begin the mixing process.


Frame With Steel Bars - Masonry Level 4
FREE

Masonry is the art and craft of building and fabricating in stone, clay, brick, or concrete block. 

In this video on masonry work, the trainer discusses the equipment and materials needed for a subcorum framework footing and demonstrates the process of marking and cutting 11 pieces of 10mm diameter main bar for footing distribution using a steel cutter machine. The importance of precision in the cutting and marking process is highlighted, and the use of 6mm diameter for making syrup is briefly discussed. The video ends with an announcement of the upcoming session on bending.


Terrazzo Pavement - Masonry Level 4
FREE

Masonry is the art and craft of building and fabricating in stone, clay, brick, or concrete block. 

These video lessons will show you how to perform the tasks essential to masonry, including plastering, bricklaying, identification of tools and materials of the trade and more.  Learn cutting-edge techniques to provide you new skills that can boost your career in the construction trade.


Setting Up & Levelling Instruments - Masonry Level 5
FREE

The video explains the concept and purpose of levelling in surveying, defining terms like "reduced level" and "benchmark". The process of leveling and establishing points within a small plot is demonstrated, emphasizing the importance of setting up and leveling the instrument before taking measurements. The steps for setting up and leveling an instrument for masonry work are also explained, including focusing the objective and eyepiece to ensure clear and accurate measurements can be taken.


Surveying Instruments - Masonry Level 5
FREE

Masonry is the art and craft of building and fabricating in stone, clay, brick, or concrete block. 

These video lessons will show you how to perform the tasks essential to masonry, including plastering, bricklaying, identification of tools and materials of the trade and more.  Learn cutting-edge techniques to provide you new skills that can boost your career in the construction trade.


Proper Set Up & Levelling Equipment - Road Construction Level 3
FREE

The video tutorial teaches how to properly set up and level equipment for road construction using a total station instrument. The tutorial covers the components of the total station, how to occupy a known point, leveling and orienting the instrument, data collection, stakeout of a point, and the importance of accurately measuring and setting out points for road construction. The worker emphasizes the importance of handling the expensive equipment with care and taking the time to ensure accurate measurements.

Installation Of Perforated Pipes - Road Construction Level 3
FREE

The video explains the importance of drainage systems in road construction and the installation process of perforated pipes. The video covers the excavation of trenches, installation of gravel, and laying of perforated pipes with 8mm diameter holes every 10cm. The video emphasizes the importance of low-pressure points and selecting appropriate materials to prevent obstructions. Additionally, necessary tools such as a spirit level, grab hammer, and chauffeur are discussed.

Construction Of Gabion Retaining Wall - Road Construction Level 3
FREE

The video demonstrates the use of gabion retaining walls in road construction to provide stability and prevent soil from sliding. Gabions are wire mesh baskets filled with stones and create a retaining wall that can withstand slopes and allow for drainage. The video covers the tools and materials required for construction, such as compacting equipment, gabion baskets, and stones, and shows how to unfold gabion baskets, fill them with stones, and perform backfilling.

Construction Of A Wooden Bridge - Road Construction Level 4
FREE

The video shows the Rwanda Polytechnic team constructing a wooden bridge. They discuss the personal protective equipment, tools, and materials they will use, including a concrete abutment and timber. The team levels the abutments, adds a timber headstock for support, and takes measurements to ensure the beam is centered and level. They also measure the distance between two boards and use a jigsaw to cut the wood after ensuring it is connected to electricity.

Honeycomb Retaining Wall - Road Construction Level 3
FREE

The video demonstrates the construction process of a honeycomb retaining wall for road construction at Rwanda Polytechnic. The first step involves laying a base of gravel and sand, followed by compacting the soil using a plate compactor machine. Instructor Eugene introduces the necessary tools, equipment, and materials required for the job, such as a plastic mallet, chisels, and safety goggles. Additionally, the video provides a tutorial on starting and operating a machine used for optimum compaction during the construction process. The honeycomb retaining wall is designed to prevent soil erosion and aid in drainage.

Basic Drawing - Carpentry Level 3
FREE

Trainers from the Revenue Activity School introduce basic drawing techniques, specifically the isometric projection of a sample vanity. They discuss different types of projections, introduce drawing instruments like the compass and set square, and present the project for the lesson, which is a sample vanity with measurements of 900mm, 500mm, and 740mm. The trainers also encourage viewers to visit Wonderful Technique's e-learning website for more tutorials.

Solid Wood Furniture-Carpentry Level 3
FREE

The video focuses on basic furniture carpentry, discussing the importance of selecting properly dried and measured timber and demonstrating the necessary preparation of materials using machines like the trim saw, surface planar, thickness, and circular saw. PPE is crucial while operating these machines, and measuring and marking where the cuts will be made is necessary. The instructors also demonstrate how to joint a remaining side for the correct thickness, measure the moisture content of wood using a hydrometer, and check the good and bad sides of the wood. The video concludes by offering further learning opportunities on their e-learning website.

Setting Of Smaw AC Welding Machine - Welding Level 3
FREE

In the video, a welding instructor demonstrates how to set up a Shielded Metal Arc Welding (SMAW) machine for sheet metal welding. He explains the components of the AC welding machine, how to connect the electrode and ground cables, and the accessories used in welding. The instructor also introduces the electrode used for welding, provides information on the amperage range for welding, and explains how to adjust the current for different electrodes. The video offers a comprehensive guide to setting up and using an SMAW welding machine for sheet metal welding.

Oxyacetycylene Gas Equipment - Welding Level 3
FREE

The Rwanda Polytechnic welding course explains the advantages and disadvantages of welding as a metal joining process. The video then focuses on oxyacetylene gas welding, describing it as a fusion welding method that requires proper use of gases and equipment to successfully form a permanent joint. The instructor explains that acetylene and oxygen are used to produce maximum heat, and the selection of gases depends on several factors such as the material being welded and the required temperature. The video also discusses the disadvantages and limitations of manual welding, including the need for specialized training and fixtures to hold the metal pieces together.

Lighting & Switching Oxyacetylene Gas - Welding Level 3
FREE

The video teaches how to properly light and switch off an oxyacetylene gas torch for welding. It covers the use of a cylinder key, pressure regulation, nozzle cleaning, and flame types. Safety precautions such as wearing goggles and keeping the cylinder key nearby are emphasized. The steps to safely shut off the welding torch are also explained, including releasing the remaining gas in the hose pipe. Different types of flames are discussed, each with varying temperatures and used for different purposes in oxyacetylene gas welding.

Bead Weld In Hand Down Position - Welding Level 3
FREE

The video showcases an instructor's demonstration of a bead weld in the down hand position using shielded metal arc welding. The instructor covers safety precautions, uses a welding machine, cables, s clamp, electrode cable, chipping hammer and brush, and helmet. The welding position requires minimal safety measures, and the demonstration concludes with cleaning up the welded bead using a wire brush and chipping hammer.

Butt Joint - Welding Level 3
FREE

The video demonstrates the process of creating a butt joint using TIG welding, emphasizing safety precautions such as proper grounding and using safety shields. The instructor explains the process of adjusting the current and gases before starting welding and demonstrates the procedure of creating a clean butt joint in 1G down hand position. The video ends with a reminder to switch off the welding machine and clean and organize the work area.


Butt Joint 1G - Welding Level 3
FREE

The video teaches how to create a butt joint using the TIG welding process. The instructor shows how to insert the tungsten electrode correctly, adjust the current and gases, and emphasizes safety precautions. The process of creating the butt joint in 1G down hand position is demonstrated, starting with edge preparation and tacking before filling the joint with filler metal. The finished product is a clean weld that does not require excess cleaning. The video ends with a reminder to switch off the welding machine and clean and organize the working area.

Butt Joint Both Side 45 - Welding Level 3
FREE

In this welding tutorial video, the instructor demonstrates how to create a butt joint on both sides at a 45-degree angle using the SMAW welding process. They begin by discussing the importance of choosing the correct electrode for the job and ensuring that the welding machine is properly set up. The instructor then shows how to properly prepare the edges of the metal pieces before clamping them together. They emphasize the importance of using proper clamps to hold the pieces in place during welding. The welding process is demonstrated, starting with the initial tack welds and then moving on to filling the joint with filler metal. The instructor explains how to control the welding arc and adjust the amperage during the welding process. They also discuss the importance of maintaining a consistent travel speed while welding. The finished weld is inspected and the video ends with a reminder to properly clean up the work area and equipment.

Padding - Welding Level 3
FREE

Welding is an important industrial and mechanical process.  Welding is a fabrication process whereby two or more parts are fused together by means of heat, pressure or both, forming a join as the parts cool.

Welders cut, join and shape metal plate, pipework and composite materials in the aerospace, construction and civil engineering industries.

These online welding lessons cover the fundamentals of industrial welding.

Basic Furniture | Make A Chair - Carpentry Level 3
FREE

In this video, a carpenter teaches how to make a basic chair using traditional joinery techniques. The video begins with an overview of the tools needed to make the chair and the measurements needed for each piece. The carpenter then proceeds to cut the wood pieces to the right size and shape using a combination of hand and power tools. The next step involves joining the legs and the apron using mortise and tenon joints. The carpenter also demonstrates how to create a curved backrest using a jigsaw. Once all the pieces are joined, the chair is sanded and finished using a combination of sandpaper and wood stain. The final product is a sturdy and functional chair that can be customized to fit the desired style.

Basic Furniture | Make A Table - Carpentry Level 3
FREE

In this video, a carpentry instructor demonstrates how to make a basic table using common woodworking tools and techniques. The instructor starts by explaining the necessary tools and materials such as saws, drills, sandpaper, wood glue, and screws. The instructor also explains how to select appropriate wood and how to measure and cut it to the desired length. The instructor then demonstrates how to assemble the table legs and attach them to the tabletop using screws and wood glue. They also show how to use a belt sander to smooth the surface of the tabletop. Finally, the instructor demonstrates how to apply a finish to the table to protect the wood and give it a polished appearance. The video ends with the finished product, a sturdy and functional table that can be customized with different finishes or designs.

Customer Care & Hosting Duties - Food & Beverages, Level 3
FREE

This video lesson focuses on customer care and hosting duties within the hospitality industry, specifically in high-end or fine dining restaurants. The instructor discusses the importance of welcoming and handling guest reservations and complaints. 

The lesson provides tips for handling various scenarios that may arise while hosting guests, such as table preferences, taking down details, and handling situations where guests request a table that is already reserved. The video also outlines the steps involved in hosting guests, such as confirming reservations, seating guests while respecting social distancing rules and placing the folded napkin on their laps.

Inserting Removing Cutting & Grinding Discs - Welding Level 4
FREE

This video tutorial is about inserting, removing, cutting, and grinding discs in welding. The instructor starts by showing the various types of discs used in welding, including cutting discs, grinding discs, and flap discs, among others. The instructor then demonstrates how to insert and remove the discs from an angle grinder, including how to use the spindle lock to secure the disc. They emphasize the importance of safety when inserting and removing the discs and warn against using damaged or worn-out discs.

Next, the instructor demonstrates how to use the cutting disc to cut through metal, showing proper positioning and technique to achieve a clean cut. They also show how to use the grinding disc to smooth rough edges and how to use the flap disc for finishing and polishing. The instructor gives tips on how to achieve a smooth finish and how to avoid overheating the metal during the grinding process.

The video also covers safety precautions when using discs, such as wearing proper personal protective equipment, keeping a safe distance from the workpiece, and avoiding loose clothing or jewelry that could get caught in the grinder. Finally, the instructor provides some tips on how to extend the life of the discs by storing them properly and avoiding excessive force or pressure during use.

1F Lab Joint – Welding Level 4
FREE

In this welding video, the instructor demonstrates how to perform a 1F lab joint using the stick welding process. The 1F lab joint involves welding two pieces of metal perpendicular to each other. The instructor starts by explaining the importance of selecting the correct electrode and setting the machine to the correct polarity. The instructor then shows how to properly prepare the metal pieces for welding, including cleaning, beveling, and tacking the joint. The welding process involves running a series of short beads along the joint, alternating between the two sides to prevent warping. The instructor also provides tips on maintaining a consistent arc length and electrode angle for a strong, clean weld. The finished product is a solid 1F lab joint that is ready for further use.

Cutting Metal With Shear Cutting Machine - Welding Level 4
FREE

In this video, the instructor demonstrates how to cut metal using a shear cutting machine. The video begins with an introduction to the machine and its components. The instructor emphasizes the importance of safety and demonstrates how to properly secure the workpiece in the machine. The video shows the proper techniques for cutting straight lines, curves, and circles using the machine. The instructor provides tips on how to achieve a clean cut and how to properly adjust the cutting blades. The video also covers the maintenance of the machine, including how to keep the blades sharp and how to properly oil the machine. The video ends with a reminder to clean up the work area and properly store the machine.

Oxyacetylene Gas Cutting - Welding Level 4
FREE

In this video, the instructor demonstrates the process of oxyacetylene gas cutting in welding. This process involves using a gas torch and a high-temperature flame to cut metal. The instructor explains the components of the cutting torch, including the oxygen and acetylene tanks, regulators, and hoses. They also emphasize the importance of safety, such as wearing protective clothing and checking the work area for potential hazards. The instructor then explains the proper technique for lighting the torch and adjusting the flame to the desired temperature. They demonstrate how to properly hold and move the torch to cut through metal, as well as how to deal with common issues such as backfire and flashback. The video concludes with a reminder to turn off the gas and properly store the equipment after use.


Perform 1G - Welding Level 4
FREE

In this video, the instructor demonstrates how to perform a 1G weld. The 1G position is where the pipe is in a horizontal position, and the weld is performed in a flat position. The instructor explains the importance of safety precautions, such as wearing protective clothing and positioning the welding machine away from flammable materials. He then demonstrates the process of preparing the metal surface, setting up the machine, and positioning the electrode for welding. He also emphasizes the importance of using the correct amperage for the thickness of the metal being welded. The instructor then demonstrates the process of welding, moving the electrode in a circular motion to create a clean and uniform weld bead. Finally, he explains the importance of post-weld cleaning and inspection to ensure the quality of the weld.


Tee Joint 1F - Welding Level 4
FREE

In this video, the instructor demonstrates how to perform a tee joint in the 1F position using the Gas Tungsten Arc Welding (GTAW) process. The instructor explains the setup and preparation required for welding the tee joint, including selecting the appropriate welding machine and ensuring proper grounding. They also discuss the importance of safety measures such as wearing proper welding gear and positioning the workpiece at a comfortable height.

The welding process starts with the edge preparation, where the instructor shows how to properly clean and bevel the edges of the workpieces. They then tack the workpieces in place and demonstrate how to control the heat input using the foot pedal and filler rod. The instructor emphasizes the importance of maintaining a consistent weld pool and avoiding overheating the workpiece.

Once the joint is fully welded, the instructor demonstrates how to properly clean and inspect the finished weld to ensure it meets industry standards. The video concludes with a summary of the key steps involved in welding a tee joint in the 1F position using the GTAW process.

Tee Joint Brazed Joint - Welding Level 4
FREE

In this video, the instructor demonstrates how to create a tee joint brazed joint. The brazing process involves using a filler metal with a lower melting point than the base metal being joined and heating the workpieces to a temperature that allows the filler metal to melt and flow into the joint. The instructor discusses the importance of cleaning the workpieces thoroughly to remove any oils or contaminants that could affect the brazing process. They then demonstrate how to properly position and clamp the workpieces before applying flux to the joint. The flux helps to prevent oxidation and promotes wetting of the filler metal. The instructor then shows how to heat the joint using a brazing torch and apply the filler metal to the joint. The finished product is a strong, clean joint that does not require excess cleaning. The video ends with a reminder to turn off the torch and properly clean up the work area.

Partitioning - Carpentry Level 4
FREE

In partitioning, a carpenter creates a dividing wall in a room or space. The process begins with measuring and marking the area where the partition will be installed. The carpenter then constructs a frame using timber or metal studs, which is secured to the floor and ceiling. The frame is covered with plasterboard or drywall, which is then taped and filled to create a smooth surface. The carpenter can then add doors, windows, or other features to the partition as needed. Finally, the finished partition is painted or decorated according to the client's specifications.

Wooden Floor - Carpentry Level 4
FREE

In Carpentry Level 4, the topic covered is the installation of a wooden floor. The instructor starts by explaining the importance of selecting the right type of wooden floor for a specific project and calculating the required amount of material. The tools required for the job are also discussed, which include a miter saw, table saw, jigsaw, hammer, and pneumatic nailer. 

Next, the instructor explains the process of preparing the subfloor, which includes leveling, cleaning, and moisture testing. The installation process is then demonstrated, starting with the placement of the first row of boards. The instructor explains how to use a pneumatic nailer to secure the boards to the subfloor, as well as how to stagger the boards and maintain proper spacing. 

The video also covers how to cut boards to fit around obstacles such as doorways and vents using a jigsaw or handsaw. The instructor explains how to properly measure and mark the boards to ensure a precise fit. The video concludes with an explanation of how to finish the edges of the floor with trim, including how to cut and install quarter-round and shoe molding.

Cleaning Tools, Equipment & Cleaning Agents - Housekeeping, Level 3
FREE

These video lessons emphasizes the importance of the housekeeping department in providing cleanliness and ambiance to hotel guests. 

The lessons outline a variety of cleaning tools and equipment such as scoring pads, mops, squeegees, and caution signs.  The polishing and cleaning of tiles and carpets using cleaning agents and a vaccum cleaner.  They also stress the significance of wearing personal protective gloves and using the appropriate cleaning cloth for specific surfaces.

Constructing A Roof - Carpentry Level 5
FREE

This video is about constructing a roof in carpentry, focusing on the different steps and techniques used in the process. The instructor first goes over the tools and materials needed for the job, including timber, roofing sheets, and nails. The video then covers the process of measuring and cutting the timber, including the use of a power saw. The instructor also discusses the importance of measuring and marking accurately to ensure a good fit for the roof. Once the timber is cut, the instructor demonstrates how to create a roof frame using joists and rafters. The video then moves on to the installation of the roofing sheets, with the instructor showing how to lay and secure them in place. Finally, the video covers the process of adding finishing touches, such as guttering, to complete the roof. Throughout the video, safety precautions are emphasized, such as wearing appropriate protective gear and working with caution when using power tools.


Constructing A Staircase - Carpentry Level 5
FREE

In the video "Constructing A Staircase - Carpentry Level 5," an experienced carpenter demonstrates how to build a wooden staircase. The video covers the various steps involved in constructing a straight flight staircase, including measuring and cutting stringers, installing treads and risers, and securing handrails. The carpenter begins by measuring and marking out the stringers, and then cutting them to size using a circular saw. Next, he explains how to install treads and risers, ensuring they are level and secure. 

The video also covers how to cut and fit handrails, including using a router to create a groove for the handrail to sit in. The final result is a sturdy, well-constructed wooden staircase that can add value and functionality to any home or building.

Exterior Cladding - Carpentry Level 5
FREE

In Carpentry Level 5, Exterior Cladding is discussed, which is the application of a protective layer to the exterior of a building. The video shows different types of cladding materials, such as timber, vinyl, fiber cement, and metal. The instructor explains how to calculate the amount of cladding needed, how to prepare the surface, and how to install the cladding using appropriate tools and techniques. Proper safety precautions are also emphasized, such as the use of personal protective equipment and proper ladder placement. The finished product is a durable and attractive exterior surface that protects the building from the elements.

1F Tee Joint - Welding Level 5
FREE

In welding, a 1F tee joint is a type of joint where one of the pieces is perpendicular to the other, and the joint is formed at the intersection. In this video, the instructor demonstrates how to perform a 1F tee joint using shielded metal arc welding (SMAW). The process begins with preparation of the base metal, which involves cleaning and beveling the edges. The instructor emphasizes the importance of proper electrode selection, which is dependent on the base metal, and demonstrates how to insert the electrode into the welding machine and adjust the amperage. The welding process is then demonstrated, starting with a tack weld before filling the joint with filler metal. The instructor explains how to control the penetration and ensure a sound weld, and highlights the importance of safety measures such as wearing appropriate protective gear and maintaining a safe work environment. The finished product is a strong, clean weld that is ready for further use.


2F Tee Joint - Welding Level 5
FREE

In this video, a 2F Tee joint is formed when two metal plates are joined perpendicular to each other, creating a T shape. In this level 5 welding process, the joint is welded from the front side or the top side, hence it is called a 2F Tee joint. The joint preparation process involves cutting the metal plates to size, grinding the edges, and cleaning the surfaces. The welding process involves setting up the welding machine, positioning the plates, and tacking the plates to hold them in place. The welder then proceeds to weld the plates, moving the electrode in a circular motion to fill the joint with the molten filler metal. Careful attention is given to maintain the correct heat and speed to ensure that the weld is of high quality. The finished product is a strong, durable weld that can be used in a variety of applications.

Bending Of Gutter Using Metal Forming Machine - Welding Level 5
FREE

In this video, the instructor demonstrates how to bend a gutter using a metal forming machine. The machine used is a combination of a metal brake and a roll former that allows for the bending of sheet metal in different configurations. The instructor starts by explaining the different parts of the machine and the various adjustments that can be made to it. Safety precautions such as wearing gloves and safety glasses are emphasized before proceeding with the bending process. The instructor then demonstrates the proper technique for loading and feeding the sheet metal into the machine. They then adjust the machine settings to produce the desired angle and shape of the gutter. The finished product is a bent and formed gutter that can be used for various purposes such as drainage or roofing. The video concludes with a reminder to clean up the work area and switch off the machine.